OAuth in Dart (from scratch)
What is OAuth?
If you’ve ever encountered a screen that asks you to grant access to some third-party service, it’s probably using OAuth.

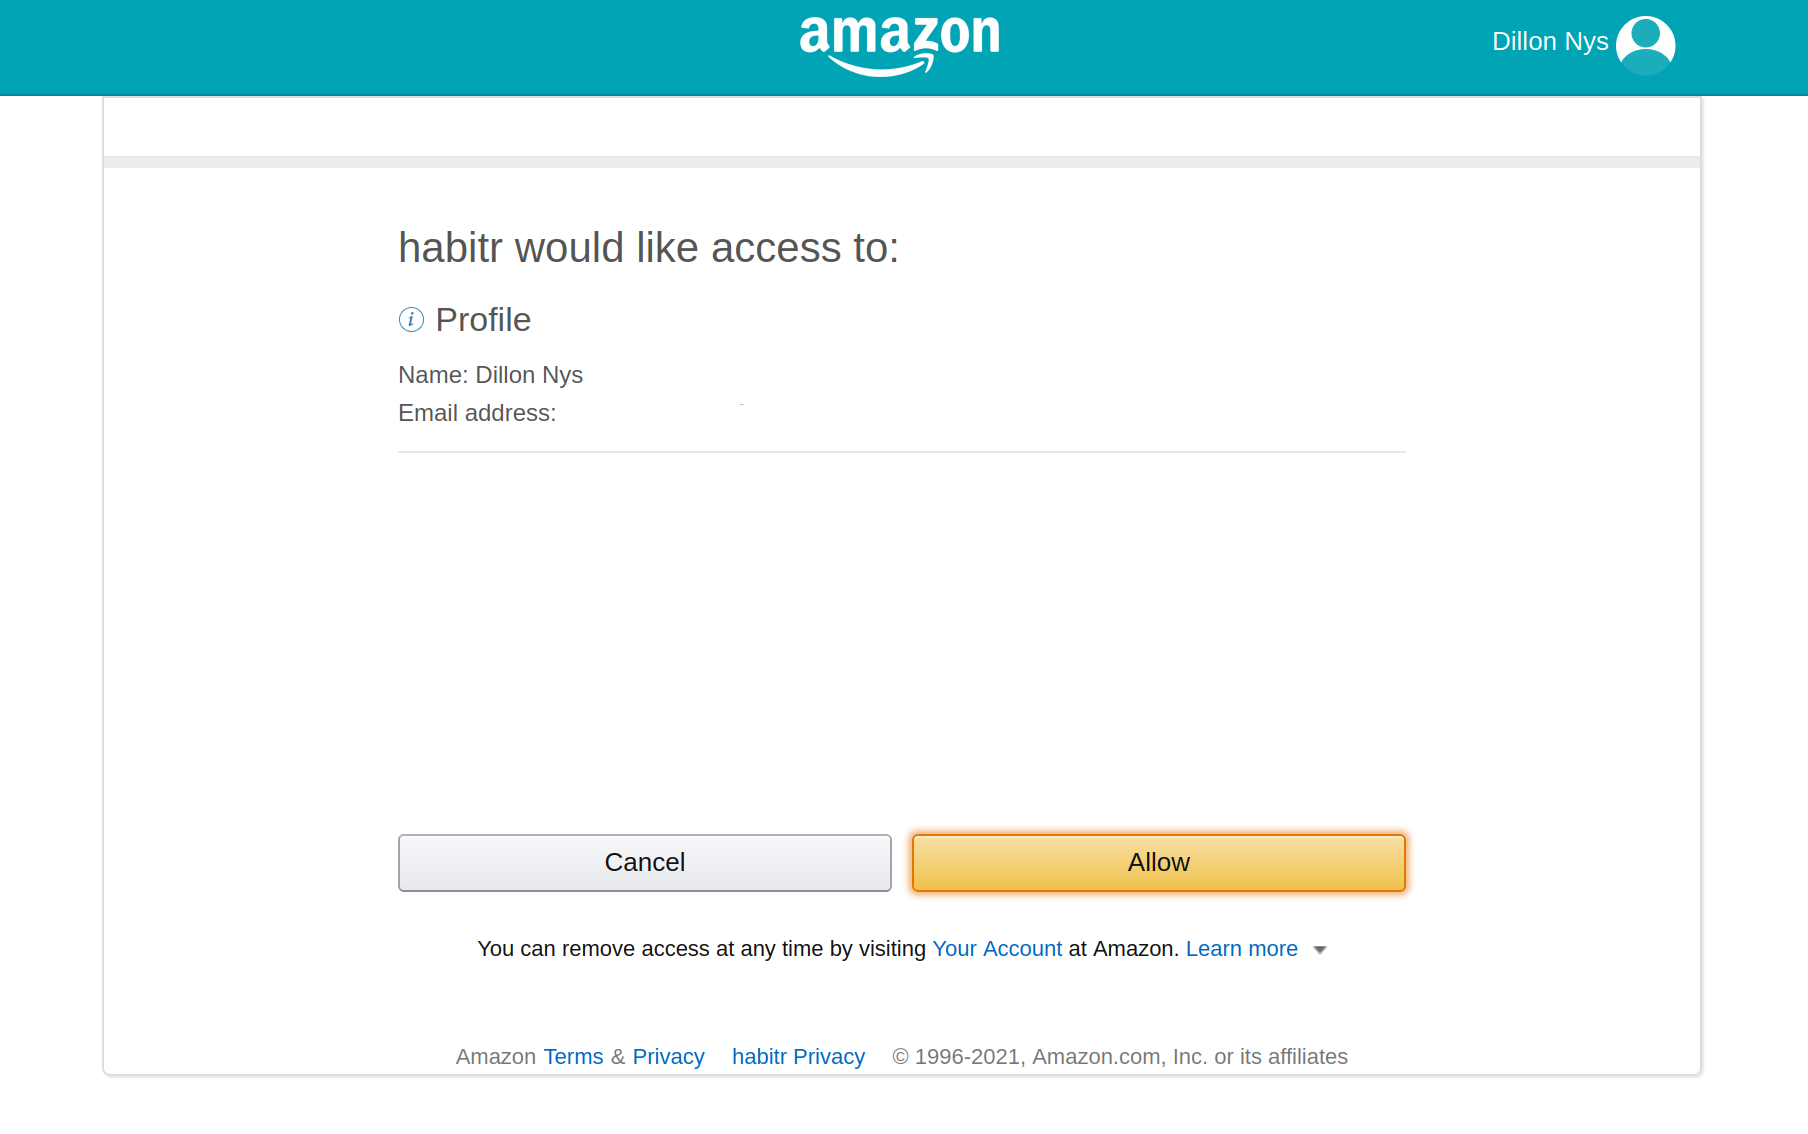
OAuth 2.0 consent screens
When people say “OAuth,” they typically mean the OAuth 2.0 protocol and sometimes, by extension, OpenID Connect (OIDC). The vanilla OAuth 2.0 specification describes a protocol for authorizing a client to access information on behalf of a resource owner–most commonly, an end-user like you or me. An example could be granting a Gmail desktop app the ability to read your emails. The app (the client) could be written by anyone, as Google (the authorization server) exposes an API to which developers can authenticate. The desktop app can obtain an authorization token via the Google servers and use that token to fetch your (the resource owner) emails from Gmail (the resource server).
This is secure because of a few different mechanisms. The most important, and least technical, is: do you trust the application? The consent screens above protect you from unknowingly letting an application gain access to your information. The second is that for each application, OAuth establishes a set of scopes available to it, limiting the privilege of the application.
The third most important is the use of short-lived tokens which cryptographically prove the application’s permission to access those resources on your behalf. These tokens typically take the form of JSON Web Tokens (JWTs). Although the OAuth protocol does not specify a particular token format, OIDC does and thus, JWTs are most commonly used for vanilla OAuth as well.
Building an OAuth App
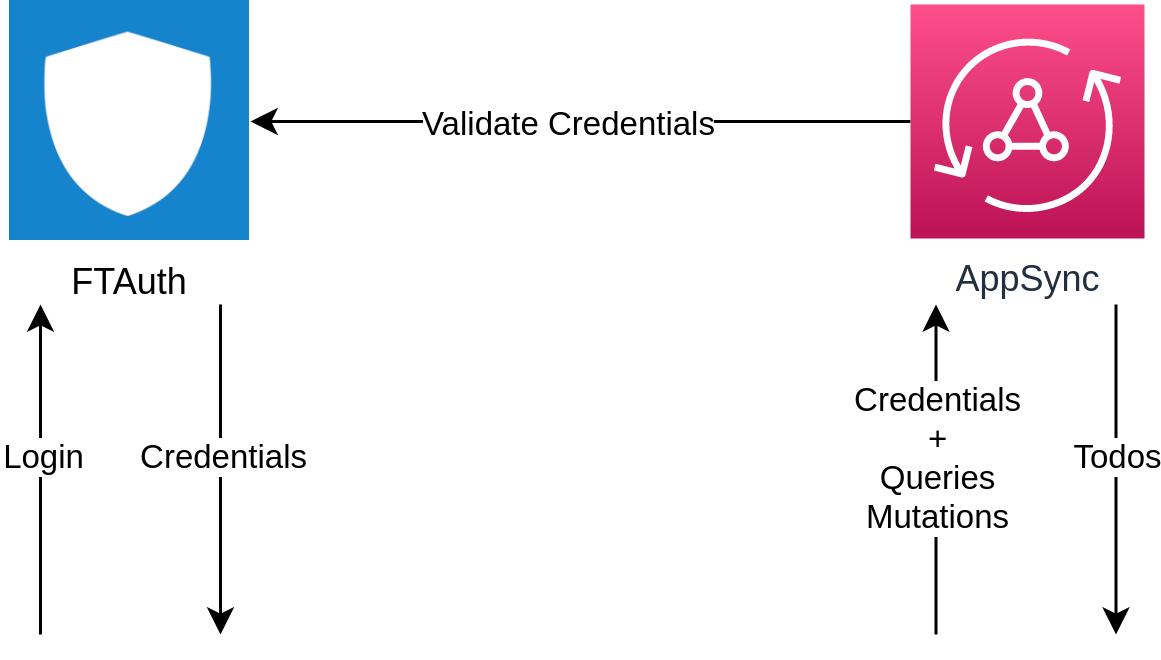
The best way to learn how OAuth works is to build an app from scratch which uses it. The examples below come from FTAuth, a project I’ve been working on in my free time to learn how OAuth works. Using AWS AppSync as a backend, we will build a todo-tracking app that uses FTAuth as the authorization server.
In this diagram, FTAuth is the authorization server, AppSync is the resource server, and the todos app is the client.
You can log in with username test and password test.
Show network requests
This example uses the Demo FTAuth server, available at https://ftauth.dillonnys.com. Anyone can create client IDs and interact with this server using an OAuth library. The only catch is that there are no guarantees to the service’s availability, and the data may periodically reset. Otherwise, it is a completely free way to play around with a live OAuth server! :-)
The full source code for the app can be found here.
Identifying the Client
The first thing we need to do as a Todos app is identify ourselves to the FTAuth server. The way we do this is with a client ID, which is issued by the FTAuth server and uniquely identifies a client. For our demo, we make use of so-called “dynamic client registration” which means that we can get a client ID at runtime (vs. getting it beforehand and compiling it into our application). Typically, this is disabled if you want to limit client registration.
To get a client ID, we simply make a POST request to the demo server asking for one with the redirect URIs we’ll need and the scopes to create.
POST https://ftauth.dillonnys.com/client/register HTTP/1.1
Content-Type: application/json; charset=utf-8

{
  "name": "demo_client_1857259234",
  "type": "public",
  "redirect_uris": [
    "localhost",
    "myapp://",
    "https://todos.dillonnys.com/#/auth"
  ],
  "scopes": [
    "default"
  ]
}
The server will send back a configuration that we can use in our frontend application.
{
  "id": "2ddbf32e-06d8-417f-a103-3a4ec6ef1661",
  "name": "demo_client_1857259234",
  "type": "public",
  "redirect_uris": [
    "localhost",
    "myapp://",
    "https://todos.dillonnys.com/#/auth"
  ],
  "scopes": [
    {
      "name": "default"
    }
  ],
  "jwks_uri": "https://ftauth.dillonnys.com/jwks.json",
  "grant_types": [
    "authorization_code",
    "client_credentials",
    "refresh_token",
    "password"
  ],
  "access_token_life": 3600,
  "refresh_token_life": 86400,
  "providers": [
    "ftauth"
  ]
}
Logging In
Now, we are ready to log in. When you click the “Login” button, a few things happen behind the scenes, kicking off the OAuth process.
- We generate a unique authorization URL that we can use to log in. This contains information related to the request, such as the scopes requested and where to redirect the user post-login.
- Some state information is persisted in the browser’s storage so that once we get redirected, and come back, we can pick up where we left off. This same information is also used to verify that the authorization code we receive is valid.
- A popup is launched with the authorization URL. If this fails (e.g. if you have a popup blocker enabled), then the browser redirects the page instead.
Authorization URL
The first step is to create a URL we can use to login. Why can’t we just visit the login page? Because FTAuth needs to know what to do after we successfully enter our username and password. This includes which scopes to grant us, and where to redirect us. Also, FTAuth reuses the same login page for every client, so generating a unique URL allows us to identify ourselves correctly.
Remember, the goal of the OAuth protocol is to distinguish the authorizing server, the client, and the resource owner/user. It can be difficult to understand this distinction in the case where we, the developer, control the authorizing server, the client, and the resource server. Instead, it’s helpful to think of each of these as being controlled by different entities, which is the most common OAuth use case.
We can easily create these URLs because they follow a pattern mandated by the OAuth protocol. For example, to create a login page that will request the default scope and redirect to localhost:8000, we can use a URL that looks like:
https://ftauth.dillonnys.com/authorize?response_type=code&client_id=e740648f-2542-4112-a5e0-cd850af8fa01&redirect_uri=http%3A%2F%2Flocalhost%3A8000&state=v1ZvW9RDrdTCefq3HyOXP1BDXFTsQRzb&scope=default
I use the oauth2 package for this step, to reduce the amount of code I need to test.
import 'package:oauth2/oauth2.dart' as oauth2;

final state = generateState();
final codeVerifier = createCodeVerifier();

final authCodeGrant = oauth2.AuthorizationCodeGrant(
    config.clientId,                        // e740648f-2542-4112-a5e0-cd850af8fa01
    config.authorizationUri,                // https://ftauth.dillonnys.com/authorize
    config.tokenUri,                        // https://ftauth.dillonnys.com/token
    codeVerifier: codeVerifier,             // BvKkMcsGg4hvwq90sPU~JUWqC7khE9V3BqA...
);
return authCodeGrant
    .getAuthorizationUrl(
        redirectUri ?? config.redirectUri,  // http://localhost:8000
        scopes: config.scopes,              // ["default"]
        state: state,                       // v1ZvW9RDrdTCefq3HyOXP1BDXFTsQRzb
    )
    .toString();
State
The OAuth protocol is a stateful protocol. Before redirecting the user from the todos app, we store two values in the browser’s storage.
await Future.wait([
    storageRepo.setString(keyState, state),
    storageRepo.setString(keyCodeVerifier, codeVerifier),
]);
Why? After we are redirected back to our app, we aren’t quite logged in yet. When FTAuth redirects the user from the login page, it will tack on two query parameters to the URL we provide: code and state, for example:
http://localhost:8000?state=v1ZvW9RDrdTCefq3HyOXP1BDXFTsQRzb&code=A5fS9fSOuv8ER1QC8n_VLg
Neither of these is the JWT token we’re searching for, but code can be exchanged for one. The state parameter must exactly match the one we included in the authorization URL. It’s sent back as a protection against a redirect URL being compromised. By validating the state parameter against the one saved locally, we can know that the authorization code, and thus the token we will exchange it for, is the one we expect.
Redirecting
To get the user to the login page, we can either launch a popup or redirect the current window. The trickier case is when we have to redirect the current window since we will have lost the app’s state when we return. This is why we store items in the browser’s storage, so that we know we were in the middle of logging in when we return.
final popupWindow = launchPopup(url);

// If the popup fails to open, redirect the current window.
if (popupWindow == null) {
  window.location.href = url;
}
Logging In
Finally, once we are redirected from the login page with an authorization code, we can perform a POST request to FTAuth to get our JWT token, which can be sent to AppSync as proof we are “logged in”.
POST https://ftauth.dillonnys.com/token HTTP/1.1
Authorization: Basic MThhMWJkOTgtMGFlNy00ODE5LTg0NjYtMDNiYTNkZDEzYjRlOg==
Content-Type: application/x-www-form-urlencoded; charset=utf-8

grant_type=authorization_code&code=A5fS9fSOuv8ER1QC8n_VLg&redirect_uri=https%3A%2F%2Ftodos.dillonnys.com%2F%23%2Fauth&code_verifier=BvKkMcsGg4hvwq90sPU~JUWqC7khE9V3BqAlN1HzAycvj82734oXKpnBlGvbkE8iHriCOA2.hIccjmBqd9vZlZ8P6u7F4Gg_4XWsM0-9oq93lJeiVRiTv4LvbtyGSmWQ
Again, I use the oauth2 package to handle this bit:
import 'package:oauth2/oauth2.dart' as oauth2;

final oauth2.Client client = await authCodeGrant!.handleAuthorizationResponse(queryParameters);
final oauth2.Credentials credentials = client.credentials;
We send the code we received from the server, along with a code_verifier value, which was the second piece of information we saved in the browser’s storage before redirecting the user. In the same way the state parameter protected us against spoofing from the server side, the code_verifier proves to the server that we were the original requestor and that the authorization code has not been intercepted by a third party. After performing a verification, the server mints and signs two new JWT tokens: an access token and a refresh token.
{
  "access_token": "eyJ0eXAiOiJhdCtqd3QiLCJhbGciOiJSUzI1NiIsImtpZCI6IjM0Y2M3NDAwLWQzODQtNGJlYy1hMWE2LTU1N2U4NmYyYzRhMSJ9.eyJhdWQiOiIxOGExYmQ5OC0wYWU3LTQ4MTktODQ2Ni0wM2JhM2RkMTNiNGUiLCJleHAiOjE2NDIzNTY4MjksImh0dHBzOi8vZnRhdXRoLmlvIjp7ImNsaWVudF9pZCI6IjE4YTFiZDk4LTBhZTctNDgxOS04NDY2LTAzYmEzZGQxM2I0ZSIsInVzZXJfaWQiOiJhMjkwMTM0ZS1iNDE3LTQyNTgtYmNhMy0yNDkxNzdhNzU4OWMifSwiaWF0IjoxNjQyMzUzMjI5LCJpc3MiOiJodHRwczovL2RlbW8uZnRhdXRoLmlvIiwianRpIjoiMjBiYmYxNWYtMTNhOS00ZTQ1LThkZTMtNmRjZDQ1ZmY3NzI1Iiwic2NvcGUiOiJkZWZhdWx0Iiwic3ViIjoiYTI5MDEzNGUtYjQxNy00MjU4LWJjYTMtMjQ5MTc3YTc1ODljIn0.Oms5EtJUpwwfHjlJobxX0_AmpeBCHwQr_ogUBOgF0ZTbuMTaonC-HU35U9aunwNW8GI8u3mcLaIyp1OQLqHU-pyjyVwEXgpZrpGRGID1a5lpQi99GYayNbQ_TMuCMWo5PW6fScnzXVaFtoKuCKrpSZcWvspyLwPnR71YBiAjhOzVHariKUPE0o1Vxb8zg0zsuY0i9bzIcljtUR-zQKWn5_Ov1cSsFwhljg_TegzFNMDZgVJUa1pmhGd7J6ATMnLTss9vywbn5-Po9zOSVQ0Bl1hWc1vCTc41_iZGDZ8kGrL6zxpLmA9U2KJL4Dn7rE4tPs4k0I4RlIMM_MZFU_Sh_pv1JEb4a0zUiuadj7hMfRHIpQYwzNXAzMrSzlkz5QwUp5qCKED1km0tabaxCxXFwBFRpJbJ43I_s92s-x_qvNmcZndqpxsMkDdviCR_OKludrhWvuoBsRJMy6jm6-jz7ftpyFJRmr9RXU2jf91faWdvIsuqGzAzbfozuonDHSLZ",
  "token_type": "bearer",
  "refresh_token": "eyJ0eXAiOiJhdCtqd3QiLCJhbGciOiJSUzI1NiIsImtpZCI6IjM0Y2M3NDAwLWQzODQtNGJlYy1hMWE2LTU1N2U4NmYyYzRhMSJ9.eyJhdWQiOiIxOGExYmQ5OC0wYWU3LTQ4MTktODQ2Ni0wM2JhM2RkMTNiNGUiLCJleHAiOjE2NDI0Mzk2MjksImh0dHBzOi8vZnRhdXRoLmlvIjp7ImNsaWVudF9pZCI6IjE4YTFiZDk4LTBhZTctNDgxOS04NDY2LTAzYmEzZGQxM2I0ZSIsInVzZXJfaWQiOiJhMjkwMTM0ZS1iNDE3LTQyNTgtYmNhMy0yNDkxNzdhNzU4OWMifSwiaWF0IjoxNjQyMzUzMjI5LCJpc3MiOiJodHRwczovL2RlbW8uZnRhdXRoLmlvIiwianRpIjoiZWM1YWEyM2ItZTYzNy00OWEyLWE2OTUtZTFlZGJkZmMxZTNjIiwic2NvcGUiOiJkZWZhdWx0Iiwic3ViIjoiMjBiYmYxNWYtMTNhOS00ZTQ1LThkZTMtNmRjZDQ1ZmY3NzI1In0.HduQXFr4UVKwqwkHmazk9koItw5QkyVFxX3WIN8eHvWNhm2Jrif-cJAYZ_i7dnk0n4t7c62DhLuBOm4c2gnCMz4VFPwIALh2RPuBXWeAf9FbD5jYJzwNCKpb0JrojDJDYuNFoWC4l45E5NCf1GC9qZmvMtSIiY2AfWgCBiKmpbfk0qi0zv2U04P34b30GWyCvAgJlqTgoxVDcOV9tdcQHa2OIgIX6gZefFG1Vz16QXxyA0jEE7P9tmcNdW5IlbhkwFuUwpQ-jeBH9bVMHDVcFtCmkdjQv1EmHXchbt3XH0TjTUWxJBtFifbzI3dkb-ZKt4zXtJAYGH2Z8EsLvI1q5Ju_zydDkXQL7_p8IGcBTpNGxh7xpcF-ZOiHU-IIek3eO6-YXd8xNX5oGKdwN7APFrmIlhw8ZZRihbYzfCPVN_h7dE3Ie4fcykclbH_d6XGem8KUYz2dyV-B7c5pT21hr6hc9pxyIv-3rpFscoZxEHG2Ni0PywxEHIE9x71P1YVT",
  "expires_in": 3600
}
You can use jwt.io to inspect the contents of these, or any, JWT tokens. For example, the access token contains the claims below. You can see it contains information like the scope requested ("default"), the client ID, the issuer (ftauth.dillonnys.com), the issued at time (1642353229), and the expiration time (1642356829).

The difference between the issued at (iat) and expiration (exp) times is 3600s, which matches the expires_in value sent from the FTAuth server. Having short-lived tokens for accessing protected resources allows for tighter control. Unlike OAuth, JWTs are meant to be stateless–possession of a JWT alone is enough to prove authorization (they are “bearer” tokens). The resource server does not need access to FTAuth’s database–and does not even need to contact FTAuth–to verify that FTAuth authorized us previously.
As such, if FTAuth issues a token and later wants to revoke it, this can be difficult. But that’s where the refresh token comes into play. Refresh tokens typically have much longer lifetimes and provide a quick way to get new access tokens. This obviates the need for long access tokens (since refreshes can happen quickly in the background) while providing a mechanism for revoking access to clients (since the refresh must happen with the FTAuth server).
Creating Todos
After all of that, we can finally start creating todos in our app. AppSync has an OIDC authorization mode which allows for any OIDC provider to act as the authorization server. When a request is made to AppSync, it first verifies that the included bearer token was issued by the OIDC server, then pulls the resource owner’s ID from the token, and finally uses this information to either grant or deny access to the resource.
mutation {
  createTodo(input: {
    name: "Write the blog about OAuth"
    completed: true
  }) {
    id
    name
    completed
    owner
  }
}
All we need to do is include the JWT in the Authorization header:
POST https://todos-appsync.dillonnys.com/graphql HTTP/1.1
Authorization: eyJ0eXAiOiJhdCtqd3QiLCJhbGciOiJSUzI1NiIsImtpZCI6IjM0Y2M3NDAwLWQzODQtNGJlYy1hMWE2LTU1N2U4NmYyYzRhMSJ9.eyJhdWQiOiI4MTJjZjNkNC02ZDgyLTQwMGMtOTZlNi0zNzAzZjEzMjE1NWUiLCJleHAiOjE2NDIzOTc3MDEsImh0dHBzOi8vZnRhdXRoLmlvIjp7ImNsaWVudF9pZCI6IjgxMmNmM2Q0LTZkODItNDAwYy05NmU2LTM3MDNmMTMyMTU1ZSIsInVzZXJfaWQiOiJkODMyNTY0ZS0wNjJjLTRjMDAtYmJjMy04ODBiMjI5OGQ2ZmQifSwiaWF0IjoxNjQyMzk0MTAxLCJpc3MiOiJodHRwczovL2RlbW8uZnRhdXRoLmlvIiwianRpIjoiN2NmYzI4NDItZjQ0Yy00NzUwLTlhZmQtZjJiYjQwOWEzYjUyIiwic2NvcGUiOiJkZWZhdWx0Iiwic3ViIjoiZDgzMjU2NGUtMDYyYy00YzAwLWJiYzMtODgwYjIyOThkNmZkIn0.LNdR9dls9TI4LHrFZ1_JOvD6EJ1N4gZxKHLAUckFj_fv9cPX5E_yVcuRd3HCUpTCgnLgchMCJ1EmH3XejLR9XWBFlaW96gJB8Y3Q3eqOJKFLnEosnsjJQ6Ix6_0Up5wJrI0lzUKsku_d9L8aglqiyxJRsGfK6cL72mAI8V4ZlKuzBOBqB5DeHUc7w5GnePGLQxyU1i_wNvhhOEHgoKdOIzfCMctj6HEVzEHRTcl2Gp4UwF5S_3a8D1R6vQnRRcn3oujtTCX2Y4HVxAqg--2ggkvwPjvOeNQ8HtrTQM-ZXtzTRG4FknVccFA7UwSIeFJblmR0G9jognF5ANKplxDnhYIu1sPfCp0A44bmydSyu9BZJQ_Df_mSeTeULt1DBQQG89cgeR73PZWvMAc9MMPEWdz3yYSZxjk3Ps92nhHs68MC8nqmuaI9i9DQZxT0S2zwsmliDjUYEgBoXCMGPV9M42_RiilUnvpiLqeZkDgbys8U0pdDQMXWpOZHJA9GvjYN
Host: todos-appsync.dillonnys.com

{
  "query": "mutation {\n  createTodo(input: {\n    name: \"Write the blog about OAuth\"\n    completed: true\n  }) {\n    id\n    name\n    completed\n    owner\n  }\n}",
  "variables": {}
}
Closing
This has been a lot to cover with OAuth and I’ve had to leave out some details. Let me know if I should continue this series and explore how to do OAuth on desktop or in Flutter! And feel free to experiment with the Demo FTAuth server using any OAuth library :-)